Assignment 3 : Reflection
1 Through contrast and comparison
3 Previous works have been selected for this part of reflection – the bowl, torus, and blister.
/
Some individual works reflections and comparison
/
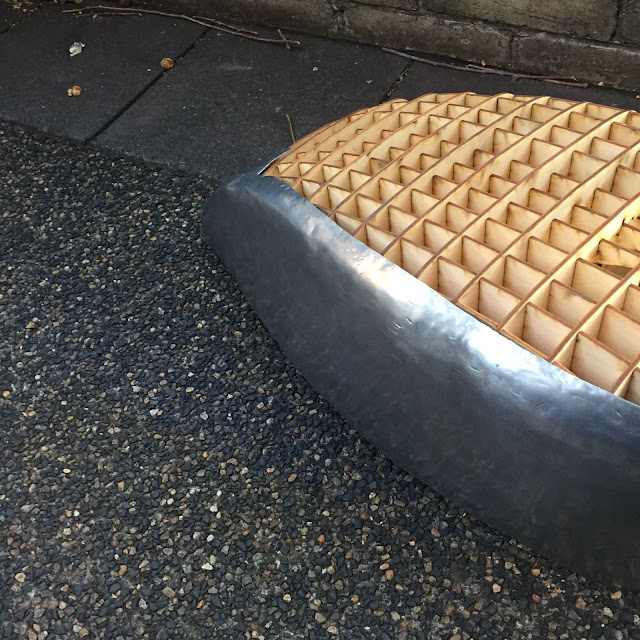
Bowl: Personal Satisfaction 3/5
The 2 Main tool I used in this assignment was the English wheel and a Nylon mallet. The main downside of this bowl product is the unflatten surface.
From the concave side of the bowl, many marks of using English wheel can be seen.


This cause of this might be:
The poor skill of using the English wheel
The English wheel is not clean
The lesson I learned from doing the bowl is to go easy with the wheel without applying too much force as the edge of the wheel will create those marks. (Which is very hard to be removed). And also I keep checking is the wheel clean without anything on it to make sure the surface won’t be starched and damaged.
In the later assignment such as the fuel tank, even if I used the English no obvious marks can be seen in both sides before and after polishing.


Fuel tank curve area formed by english wheel, no mark is found
From the convex side of the bowl, even if it is matching with the 275 mm radius arch, when putting my hand on it I can feel its highest (lowest) point is not in the center. In other words, this bowl is not a perfect circle surface (sorry I can’t find a better word but what I mean here is that the circumcenter of the bowl is not the lowest point of the convex)

The right side is slightly flatter than the left side
This might be caused by the uneven force applying on the bowl perimeters when shrinking it and stretching the middle portion.
This can be improved greatly by:
1 Drawing guidelines. Even without perfectly even force, at least the lowest point of the convex will be the center of the bowl in the process.

2 Using paper patterning method on a skeleton model of a bowl
Although this might be too much effort in making a simple bowl, however, it is always to aim for perfection to have a perfect arch and sphere surface
By tracing the
3 Making a Female mold using CNC
This method of improving the bowl is inspired by watching a video of people making a cosplay costume by first making a clay based and laser cutting details of it to create a female mold for a suit. This method is also discussed within our fuel tank group.
https://www.facebook.com/ImpactProps/videos/1684164348365183/?hc_ref=ARSZy77ni7PD-aJcd9GY3EZFq_r3LgXsiRv2djcZkc0VdMnRb0vVcG2rUlYaSbEjjFY
A simple method can be used in the making the bowl and allow the shape of the bowl is as perfect as possible.
/
Torus: Personal Satisfaction 4/5
This is one of my proudest finishing work in the course. The method tool I used is a nylon mallet and a metal small hammer. No English wheel is used in this assignment.
(Mainly because of a previous fail attempt on the bowel.)
The process of making the torus involves me learning to apply a constant force to create a perfect arch which I failed to in the bowl assignment. The ending result shows I have improved. However, my arch is not really deep which might be why my arch is more accurate and symmetrical than the bowl ones.


Relatively more symmetrical than the bowl(seen above)
If I had a chance to redo this torus again:
1 Mark the in intersecting portion of the 2 curves
2 paper pattern my current torus to understand what to hammer first
-from what I learned is that I should always start with the curve with a few bendings


In order to making a deeper curve when remaking next time
By using the U shape dummy, I used the small metal hammer to tap the surface into smoother surface instead of sanding it, which I really like this technique. But this cause the surface is not completely smooth. I could have used an even finner hammer in order to create a finner pattern on the torus.


I really like this pattern thus I didnt sand the torus
The blister: Personal Satisfaction 3/5
This is after the torus assignment. And my skills in applying a constant force on the metal surface has been improved. It can be shown on the almost symmetrical shape from the blister. However, the surface has many bumps which I did not manage to remove in the process. (due to time and other assignments)


Many bumps are found on the surface
Tiiny ones
And in this process, I become more confident and decisive to hammer the metal comparing to the process of making the bowl.
Things I can improve on this blister is I didn’t fix the metal sheet tight enough at the beginning which causes the metal shifted position in the process and have a slight error. (not obvious but hey I want it to be perfect)
How I can improve this: I might use a marker to draw the shape of the template to trace is the metal shifting in the hammering process.
And I also created a stretch mark in the process as I didn’t notice the blister height has over the template thickness.


Accident
It is said it is better to cut the extra portion off but I decide not to as I like how it looks like a sculpture when hung on a wall.
A comparison is made with my classmate Zoey Song. We had a similar shape for the blister. The part I did better is that my tiny dip portion and the edge of the blister is more defined than hers as I used different timber strip with the mallet in the process to help to deal with the small edges which the mallet cannot reach.


My tip

Zoey's tip

My edges

Zoey's Edges
The thing she did better has she had her metal fixed firmly which didn’t have the same issue as I did and resulting in a better and more accurate shape compared to the template.
/
Comparison of my 3 works
Bowl
|
Torus
|
Blister
|
|
Arch/ Curves
|
It is not fully symmetrical
|
The skills of making curves being symmetrical have been improving
|
The skills of making curves being symmetrical have been improving when being able to apply a constant force on the metal surface
|
Bumps
|
Obvious English makes (no bumps)
|
Occasionally have bumps and stretches due to tapping the surface as a polishing
|
Worse in all 3 due to mallet unable to reach every single bump to flatten them.
Should create timber strips with a flat surface to remove the bumps
Or even putting the blister on a sandbag and using small timber hammer to tap it off.
|
accuracy
|
The bowl is not fully symmetrical but it is fairly accurate
|
No standard of accuracy but the 2 curves on the torus is fairly symmetrical
(better than the bowl)
|
The blister is not 100% accurate as the metal sheet shifted place in the process
|
Remark
|
Unskilled in using the English wheel.
Had improvements in making the fuel tanks.
(at least no marks!)
|
Relatively the best
|
If bumps on the blister are removed by further tapping it off with smaller timber strip it would be way better and the surface would be more smooth and accurate.
|
/
2 Through reflection on your discipline
Architects always play with the form of building – walls, roof or even floors. In this course of the digital making, I have expanded my exposure to more complex form such as a torus, the double curving surface which I have never heard of and think it would be a hard item to make.

The metal forming skills are really useful for me when designing curving elements in a building. Usually, these days as an architect we just generate the curvy form in software and don’t really pay much attention to how is that specific element is made.
This makes me understanding designing is not just about the concept but also the actual execution. For example, paper bending characteristic is really different from a sheet of aluminum, (from paper patterning)
The most challenging part for me is to understand the correct time in shrinking the metal and stretching the metal. In the early stage of making the fuel tank, I only focus parts by parts without considering the entire piece. This causes serious bending in my aluminum sheet and deforms my entire fuel tank skin in the middle of the process. I had to identify where is the center of the bending and locate the correct position to strengthen it by striking that portion in order to avoid it to bend again.
( to be exact, no photos were taken as I was very panic at that stage, it changed from a C shape to a U-shape or even V shape suddenly .)
I have never met people in the industrial design discipline. They are really good at using programs such as rhino, slicers and all those produce designing and making tools
And this changes my thought they are only designing tools. And they really open up me many other possibilities in making my architectural model, such as CNC, using concrete by molding, using skeleton model to build a contour model. The process of interacting with different discipline really helps myself in the future career.
Comments
Post a Comment